Heat Sink Installation
Some Intermountain AC-12 Notes |
Initial Impressions, March 2010 - Scroll down for June, 2012 update
An Intermountain AC-12 was on my Christmas list and Santa Claus came through. After reading about the various troubles people have had with their AC-12s, I had some concerns about this locomotive. After lubing it as described in the instructions I placed it on the layout and began testing. The initial results were not too bad. The locomotive ran smoothly and quietly. The top speed was about 39 scale miles per hour. This was somewhat slower than I would have liked, but was marginally acceptable. The current draw at top speed was .45 amps. This seems high to me, but again is marginally acceptable. I did have one decoder overheating incident after about 25 minutes of continuous operation. The rear light blinked several times and the loco shut down. After a minute or so it restarted and continued on. Time to open the tender.
Heat sink
I had read on the Espee group at Yahoo about the decoder overheating and short circuit problems with the weight in the tender, so I was pleased to discover that insulating tape had already been placed between the weight and the brass pickup strips in the floor of the tender. This locomotive was shipped directly from Intermountain (in Loveland, CO) to our house. This problem must have been corrected at Intermountain.
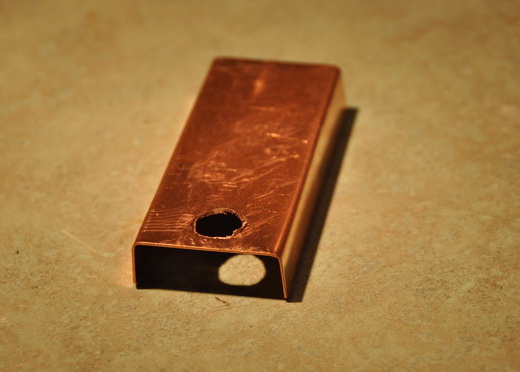
To solve the decoder overheating problem I made a heat sink from .03 inch thick copper sheet as shown in the next picture. It is about 2 1/2 inches long by 1 1/8 inches wide. There are two ears bent down to fit over the sides of the speaker enclosure. The ears are 7/16 inches wide. The hole is for post that secures the tender floor to the tender body. I bought the copper sheet at Ace Hardware here in Fort Collins.
|
Heat Sink Installation |
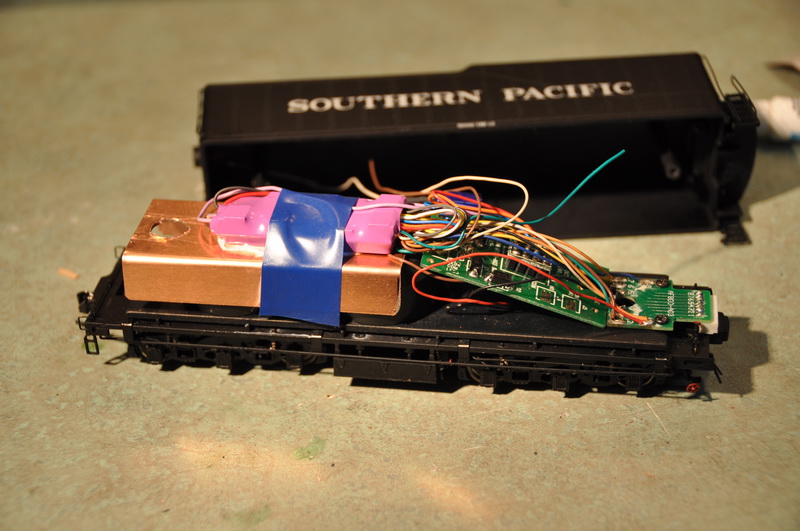
After carefully separating the decoder from the speaker enclosure and peeling off the foam tape, I installed the heat sink over the speaker enclosure, aligning the hole in heat sink over the screw hole in the tender floor. Next I applied heat sink compound to the decoder and fastened it flat side down on the heat sink with a piece of blue electrical tape. See the following photo. There have been no more overheating incidents, even with periods of continuous operation as long as 45 minutes. The wiring was, and still is, a bit of a mess. That may get tidied up later. But for now, it works; and out of sight, out of mind.
Speed Issues
InterMountain recommends running your DCC system at 16 to 18 volts. So I tried moving my DCS100 command station switch to "O" gauge. This increased the track voltage (as measured with a RRampmeter) from 13.5 to 18 volts. No problem getting to 70 MPH now! But I just don't want to run my HO layout at "O" gauge voltages. So I compromised. The Digitrax documentation says that the maximum HO voltage can be as high as 15 volts. So I set the command station switch back to HO gauge, took the cover off the DCS100, and adjusted the track voltage to 15 volts again as measured with a RRampmeter. I confirmed the max voltage using a Tektronix oscilloscope. I also did some looking around the Internet with Google for information about maximum track voltages and came to the conclusion that decoders in general are supposed to withstand up to 22 volts. I don't know how much to rely on this, but it gives me some reassurance that going from 13.5 to 15 volts is probably OK.
The locomotive then had a top speed of 46 MPH and with the heat sink it will run for apparently unlimited periods without overheating the decoder. Given this modest success and the fact that I love the way it looks and sounds, I ordered another one from Ulrich Models in Berthoud, CO and had it the next day. I made the same modifications to it as to the first AC-12.
I also read on the Espee group about the sliding electrical pickups being too tight, causing excessive drag. I removed the axle cover plates on the bottom of the loco to gain access to the sliding electrical pickups. Once the axle covers are removed the electrical pickups can be lifted out and bent back to where they touch the backs of the drivers only very lightly. This reduced the current draw from .45 amps to about .35 amps and increased the first loco's top speed to 55 MPH and the second loco's top speed to 63 MPH. There may still be some scope for reducing drag in the drive train, but that will have to wait until I'm ready to open the boiler. Right now I have a certain reluctance to start hacking away at all those intricate piping details.
After doing some speed matching with the AC-12 speed tables, I consisted the AC-12s with a BLI AC-4 and have them pulling a 33 car train up a 2.5% grade. One AC-12 is leading, the other is mid-train, and the AC-4 is pushing at the rear. They are quite a sight and make a wonderful sound! For some pictures of this see the InterMountain AC-12 Album.
Update - June, 2011A couple of months ago both of the AC-12s started having new problems. Both were losing power and their top speed was dropping. 4275 would randomly stop and refuse to move at all. I concluded that the motors were dying, so I got some Mashima 1833s from Hong Kong for cheap and installed them. I also replaced the weird orange headlights and backup lights with sunny white LEDs. Everything was wonderful until one of the brass inserts that hold the driver crankpins fell out and vanished into another dimension.
So I called Intermountain Railway and, long story short, they said to bring the locomotive to their office in Longmont (about 20 miles from here). We were shown up to the "locomotive room" and had a pleasant chat with the technician while he did the repair and gave us some spare parts. There was no charge and we also got a nice escorted tour of their facility. In and out and done in nothing flat! Needless to say I was greatly impressed with the staff's friendly attitude and helpfulness. We also found out how make one of the tiny, tiny socket wrenches used to tighten / remove the driver crank pin hex head screws.